Older homes across Perth have character. But their roofs? That’s often where age starts to show first.
What looks fine from the street can hide issues that slowly turn into leaks, structural damage, or expensive repairs. The key is knowing what to look for before it gets to that point.
🧱 Cracked or Broken Tiles
This is one of the most common issues with older tiled roofs.
Over time, tiles become brittle from constant sun exposure and temperature changes. Walking on the roof, storms, or even just age can cause cracks.
Why it matters
A single cracked tile can let water in. Multiply that across a roof and you’ve got a bigger problem brewing underneath.
🌧️ Roof Leaks (That Start Small)
Most roof leaks don’t start as obvious drips from the ceiling. They begin subtly.
You might notice:
Water stains on ceilings
Damp smells in certain rooms
Peeling paint or bubbling plaster
By the time it’s visible inside, the damage has often been building for a while.
🧲 Rust and Corrosion (Metal Roofs)
For older metal roofs, rust is a major red flag.
Years of exposure, especially in coastal areas around Perth, can wear down protective coatings. Once rust sets in, it spreads and weakens the structure of the roof.
What to look for
Discolouration, flaking metal, or visible holes starting to form.
🌿 Moss, Lichen, and Dirt Build-Up
It might not seem like a big deal, but organic growth can cause serious issues over time.
Moss and lichen hold moisture against the roof surface, which accelerates wear and can lead to:
Tile deterioration
Water ingress
Blocked drainage paths
🧱 Worn Ridge Capping and Pointing
The ridge capping (the tiles along the peak of your roof) is held in place by mortar or flexible pointing.
In older homes, this material breaks down over time.
The risk
Loose or cracked ridge capping can let water in and even become a safety hazard in strong winds.
🌬️ Loose or Dislodged Materials
Strong winds, aging fixings, and general wear can cause parts of the roof to shift or come loose.
This includes:
Tiles slipping out of place
Metal sheets lifting slightly
Flashings separating from surfaces
These gaps are often where water finds its way in.
🏚️ Sagging Rooflines
This is a more serious structural issue.
A sagging roofline can indicate problems with the underlying framework, such as:
Rotten timber
Long-term water damage
Structural fatigue
If you notice dips or uneven lines in your roof, it’s worth getting checked immediately.
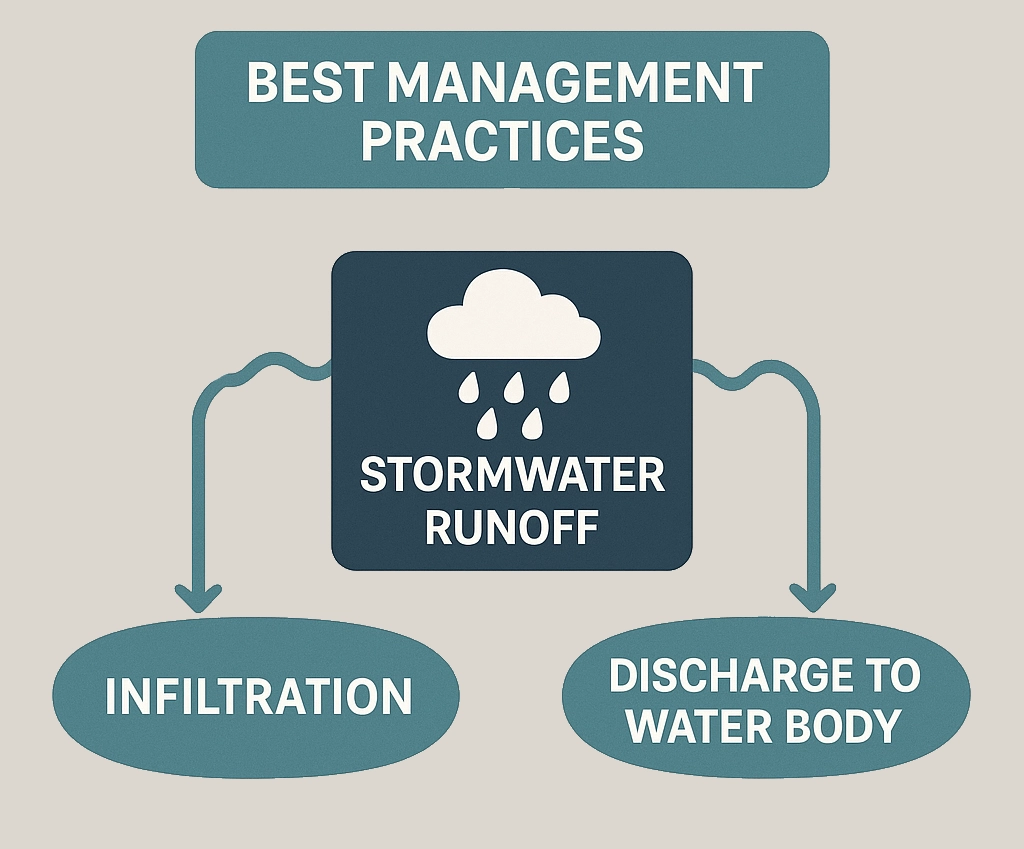
🌊 Blocked or Failing Gutters
Older homes often have gutters that are either undersized or poorly maintained.
Leaves, dirt, and debris can build up and stop water from draining properly. This can lead to overflow, which pushes water back under the roofline.
⚡ Why Older Roofs Need a Proper Inspection
Here’s the reality. Most of these issues don’t exist in isolation.
A cracked tile might sit next to worn pointing. A small leak might be tied to blocked gutters. It all adds up.
That’s why a proper roof inspection matters. Not just a quick look, but a thorough check that identifies what’s happening now and what’s likely to happen next.
🧠 The Smart Move
If your home is 15–20+ years old and hasn’t had a recent roof check, there’s a good chance something is starting to wear out.
Catching these problems early can mean the difference between a simple repair and a full restoration.
Need a Second Opinion?
If you’re unsure about the condition of your roof, it’s worth getting it looked at properly.
A good roofer won’t just quote a job. They’ll show you what’s going on, explain your options, and help you decide whether a repair, restoration, or replacement actually makes sense.
Choosing between a tile roof and a Colorbond roof isn’t just about looks. In a place like Perth, your roof has to deal with intense sun, coastal salt air, and heavy winter downpours. The right choice comes down to how each material performs under those conditions, not just what looks good on day one.
🏠 What is a Tile Roof?
Tile roofs are typically made from concrete or terracotta and are a staple across many older Perth suburbs.
They’re known for their solid, traditional look and have been trusted for decades in Australian conditions.
Where tile roofs shine
Tiles handle heat well, naturally insulating your home and helping regulate internal temperatures. They’re also resistant to corrosion, which is a big plus in coastal areas.
Where they fall short
They’re heavier, more prone to cracking, and often require more ongoing maintenance. Over time, issues like slipped tiles and worn pointing can lead to leaks if not addressed early.
⚙️ What is a Colorbond Roof?
Colorbond is a pre-painted steel roofing system designed specifically for Australian conditions.
It’s become increasingly popular across Perth, especially in newer builds and modern renovations.
Where Colorbond shines
Colorbond roofs are lightweight, durable, and built to handle harsh UV exposure. They’re also quick to install and generally require less ongoing maintenance.
With proper installation, they’re excellent at shedding water, making them ideal for heavy rain.
Where they fall short
They can be noisier during rain if not properly insulated, and in some cases, they don’t offer the same thermal mass as tiles.
🌤️ How Perth Conditions Change the Decision
This is where the real difference shows.
Heat
Perth summers are unforgiving. Tile roofs tend to absorb and slowly release heat, while Colorbond reflects more heat when lighter colours are used.
Coastal exposure
If you’re near the coast, salt air is a major factor. Tiles won’t corrode, but Colorbond (when using the correct coastal-grade materials) is specifically engineered to resist it – provided they are regularly cleaned and maintained.
Storms and rain
Colorbond generally performs better in heavy rain due to its smooth, continuous sheets. Tiles rely on overlaps, which can become weak points over time.
💰 Cost Comparison
Tile roofs are often cheaper upfront if you’re building new, but they can become more expensive over time due to maintenance.
Colorbond typically costs more initially, but the reduced maintenance and longer lifespan can make it more cost-effective in the long run.
🔧 Maintenance Differences
Tile roofs usually need more regular attention. Cracked tiles, ridge capping, and general wear can all lead to issues if ignored.
Colorbond roofs are lower maintenance, but they still need occasional inspections to ensure fasteners and seals remain intact.
🎯 Which One is Better?
There’s no universal winner. It depends on your priorities.
If you want a classic look, strong insulation, and don’t mind some upkeep, tile can be a solid option.
If you prefer something modern, low-maintenance, and built for efficiency in harsh conditions, Colorbond is often the better long-term choice.
🧠 The Smarter Way to Decide
Instead of asking “which is better,” the real question is:
Which is better for your home, your location, and how long you plan to stay there?
That’s where most people get it wrong. They choose based on appearance or upfront cost, not performance over time.
Your roof is one of the most important parts of your property. It shields your home from the elements, protects your belongings, and keeps your family safe. Over time, however, even the best tiled roof will show signs of wear and tear.
In Western Australia, harsh weather conditions can take their toll, especially on the cement mortar that holds ridge tiles in place. If you have started to notice cracked mortar, loose roof tiles, or frequent roof leaks, it may be time to consider roof rebedding and repointing.
Understanding Roof Bedding and Pointing
To understand what rebedding roof tiles involves, you need to first understand what bedding and pointing is.
Roof bedding refers to the layer of cement mortar that secures ridge caps and ridge tiles along the peak and edges of a tiled roof. This mortar provides structural stability, keeping tiles fixed in position during strong winds and storms.
Pointing, on the other hand, is the outer layer applied over the bedding. Traditionally, this was also cement, but today a flexible compound is used for better durability and movement. Flexible pointing seals the edges of ridge tiles, helping to prevent entry points for water, pests, and debris. It also gives the roof a clean, finished appearance.
Why Roof Rebedding Matters
Over time, the original cement mortar can deteriorate due to weathering, movement in the structure, and simple ageing. When this happens, the bedding can no longer hold the ridge tiles securely. You may begin to notice signs such as broken or cracked mortar, gaps around ridge caps, or even tiles that have come loose after heavy rain or strong winds.
This is when roof rebedding becomes necessary. The process involves removing the old mortar, cleaning the surface, and applying fresh bedding to ensure the ridge tiles are held securely in place. In many cases, the ridge tiles are physically removed and relaid with care to match the existing roof layout.
How is Rebedding Different from Repointing?
Repointing roof tiles is often done after rebedding, but they are not the same process. Repointing involves applying a layer of flexible pointing compound over the new or existing bedding to seal gaps and improve water resistance. In some cases, if the bedding is still structurally sound, repointing alone may be sufficient to prevent roof leaks and improve the roof’s appearance.
However, repointing a roof that has badly cracked or damaged mortar underneath is a short-term fix that may lead to more costly repairs in the future. A professional roofer will assess whether the bedding holds firm or if your roof tiles require rebedding as well.
It is generally recommended to repoint a tiled roof every ten years to prevent damage caused by deteriorated mortar. Regular repointing and rebedding not only help maintain the roof’s structural integrity but can also save you money on costly repairs down the track by prolonging the lifespan of your roof.
Repointing roof tiles may help protect your property from damage by sealing entry points for moisture and pests, reducing the need for repeat maintenance and safeguarding your home against water ingress and wood rot.
Common Signs Your Roof Needs Attention
Here are some of the most common signs that indicate your tiled roof may need rebedding or repointing:
Cracked or flaking mortar along the ridge caps
Loose roof tiles or shifting tiles after storms
Water stains in the ceiling indicating roof leaks
Signs of wood rot in the roof structure or eaves
Entry points for pests or birds around ridge tiles
Debris buildup in gutters from crumbling mortar or granules of roof tile
If you notice granules or pieces of roof tile in your gutters, this may be a sign that your roof needs inspection for damage. A healthy roof is essential to the health of the rest of your property, and early detection of these signs can prevent major structural issues.
The Process of Rebedding Roof Tiles
Rebedding is a time consuming task that requires skill and precision. At Fremantle Roofing Services, we follow a proven process to ensure a quality result.
Physically inspect the roof to assess the condition of the bedding, pointing, tiles, and gutters
Remove all loose ridge caps and carefully clean the surface beneath
Remove old mortar and replace it with fresh cement mortar as bedding
Relay ridge tiles securely into place
Apply flexible pointing to finish and seal the joins
Clean the roof area thoroughly, checking for any missed entry points or damage
Our team is trained to handle all types of tiled roof repairs with minimal disruption to your home or business. We use high quality materials and proven techniques to ensure long lasting protection.
Why Choose Fremantle Roofing Services?
We are a locally owned and operated roofing company with years of experience in repairing tiled roofs across Perth. Our qualified team understands the unique weather conditions in Western Australia and how they affect roofing systems.
Whether you are dealing with cracked mortar, roof leaks, or loose ridge tiles, we offer reliable solutions that focus on long term performance and customer satisfaction. Our roofing professionals are fully insured and committed to the highest standards of safety and workmanship.
We also provide free roof inspections, giving you peace of mind and a clear plan for your property maintenance needs.
If you are a homeowner, choosing the right roofing material is a long term investment. Tile roofs are a popular option across Western Australia, known for their aesthetic appeal, energy efficiency, and resistance to harsh weather conditions.
But how long do tile roofs last, and what can you do to maximise their lifespan?
At Fremantle Roofing Services, we work with all types of tile roofing systems and understand what it takes to preserve them. In this guide, we explore the average life expectancy of roof tiles, how different roofing materials compare, and what maintenance is needed to avoid costly repairs or roof replacement.
Types of Tile Roofing Materials
Tile roofs come in a variety of materials, each with unique characteristics that affect their durability and appearance:
Clay tiles are manufactured by baking moulded clay and come in a variety of colours, including the popular terracotta range. These tiles provide a classic and timeless look that appeals to many homeowners. Additionally, clay tiles are highly resistant to fire and extreme weather conditions, making them a durable choice for areas prone to such challenges.
Concrete roof tiles are made from a mixture of water, cement, and sand, moulded under high pressure. They are cost effective, extremely durable, and available in various styles and colours to complement your home’s architectural design.
Tiles tend to be heavier than other roofing materials, which can impact the need for structural support, especially in older homes or those with less robust roof structures, Tiles are resistant to rot and pests, which adds to their longevity as a roofing material. While most roofs made from clay or concrete are designed to last several decades if properly installed and maintained, tiled roofs are not suitable for every home. In areas prone to heavy snowfall or rainfall, the weight of tiles can be a concern and may require additional structural assessment.
The Average Lifespan of a Tile Roof
So, how long do tile roofs last? The answer depends on several factors including the material used, the quality of installation, and ongoing care. In general:
Concrete roof tiles last between 40 to 70 years
Clay roof tiles last between 50 to over 100 years
Terracotta tiles, a specific type of clay tile, often reach 100 years or more
Slate roofs can last over 100 years, making them one of the most durable roofing options available.
In Australia, roof tiles can last anywhere from 50 to 100 years, depending on the type of material, installation quality, and regular maintenance.
However, Australia’s diverse climate, with its range of extreme weather conditions, can significantly impact the longevity of roof tiles. Environmental factors such as hail, high wind speeds, ice, and falling branches can shorten the lifespan of your tiles if not properly maintained.
Maintenance of Tile Roofs
Proper maintenance is essential to significantly extend the life of your tile roof. Key maintenance practices include:
Regularly cleaning gutters to prevent water damage to roof tiles.
Promptly replacing broken and cracked tiles to avoid further damage or water ingress.
Ensuring water effectively drains off the roof to prevent leaks and moisture build-up.
Conducting structural assessments for older homes to confirm the roof structure can support the weight of the tile roof.
Avoiding silicon repairs as a long term solution for leaks, as silicon can degrade over time.
Scheduling regular inspections to identify damage from environmental factors like hail, falling branches, or other severe weather events.
Applying a protective coating to improve the durability and longevity of tile roofs by shielding them from weather damage and moisture absorption.
Removing lichen and moss growth, as these can trap moisture and lead to the deterioration of roof tiles over time.
Trimming back overhanging tree limbs to prevent damage to roof tiles caused by falling branches or excessive shade that encourages moss growth.
Avoiding silicon repairs as they are not considered a long-term solution for leaks, as the material tends to degrade over time and may require frequent reapplication.
Realigning and securing tiles that have moved or become loose to ensure the roof remains watertight and structurally sound.
Cost Considerations for Tile Roofs
When considering a tile roof, it is important to understand the associated costs:
The installation cost of a tiled roof typically ranges from $8,000 to $23,000, with an average cost around $15,500.
Tile roofs generally have a higher upfront expense compared to other roofing materials due to the cost of materials and the complexity of installation.
Despite the initial investment, the longevity and minimal maintenance requirements of tile roofs can make them a cost-effective choice in the long run.
Tiles made from clay or concrete are popular for their durability and long lifespan, often exceeding those of cheaper materials.
Additionally, having a tile roof can positively impact the resale value of your home, as they are associated with quality, durability, and aesthetic appeal.
Environmental Impact of Tile Roofing
Tile roofing also offers several environmental benefits:
Many tiled roofs are made from natural materials such as clay, which are abundant and recyclable.
The long lifespan of tile roofing reduces the frequency of roof replacements, thereby decreasing the amount of roofing waste sent to landfills.
The superior insulation properties of tiled roofs contribute to energy savings by helping regulate indoor temperatures—absorbing heat during the day and releasing it slowly at night—which reduces reliance on heating and cooling systems and contributes to a smaller carbon footprint.
Final Thoughts
So, how long do tile roofs last? With the right care and maintenance, concrete tiles can last up to 70 years, clay tiles can exceed 100 years, and slate roofs may last even longer. While the diverse Australian climate poses challenges, proper installation, routine inspections, and timely repairs can significantly extend the lifespan of your tile roof, protecting your home and investment for decades to come.
At Fremantle Roofing Services, we specialise in all aspects of tile roof care, from routine inspections, roof repairs, roof restoration and roof cleaning services to full roof restoration. If you have cracked tiles, missing tiles, or want to assess the condition of your roof, contact our friendly team today. We are happy to provide a comprehensive roof assessment and help you choose the best path forward for your home.
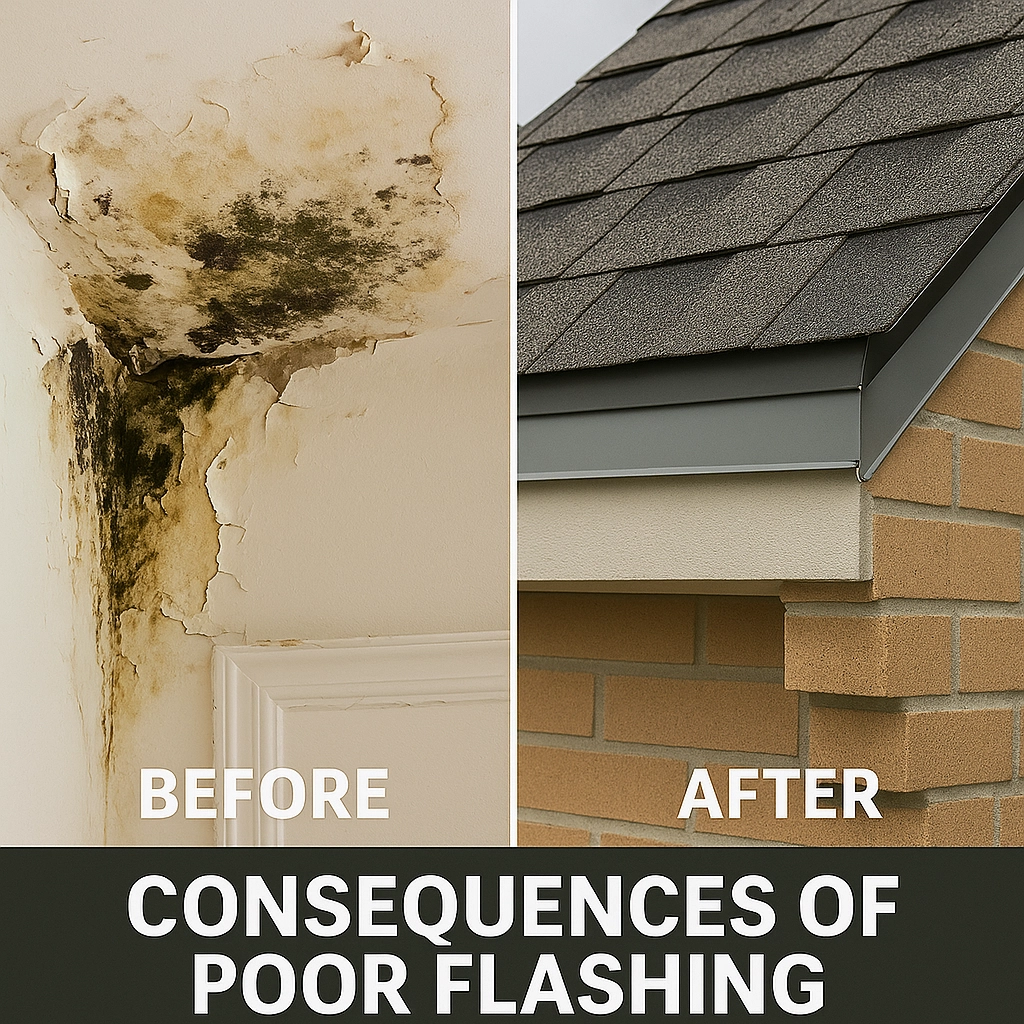
Flashing is a critical component of any roofing system, especially in a country like Australia where harsh weather conditions are common. From preventing leaks to protecting structural elements, flashing plays a major role in maintaining a watertight and durable roof.
In this guide, we explore the different types of flashing, flashing materials, and their applications on various roof structures including sloped roof systems, box gutters, and vertical features like masonry walls and chimneys.
What Is Roof Flashing?
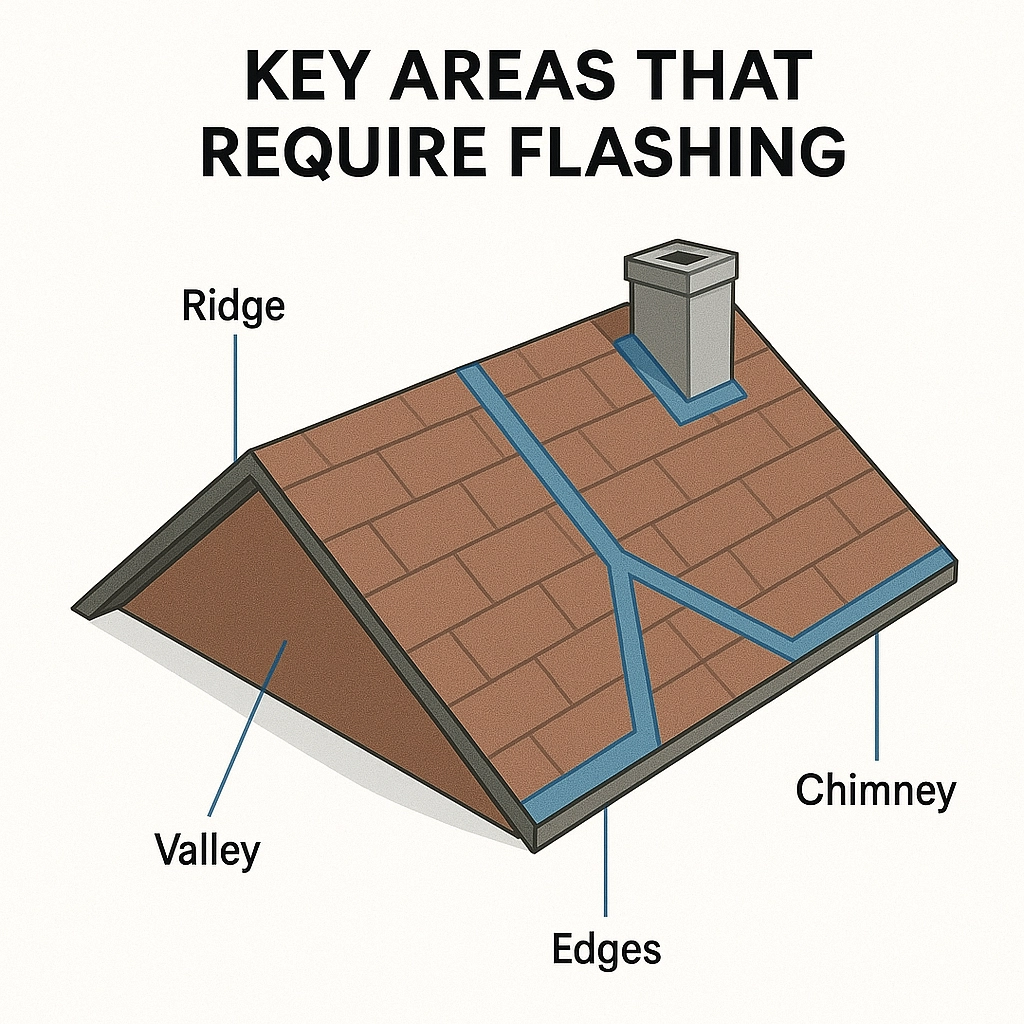
Roof flashing refers to thin pieces of impervious material installed around vulnerable areas of the roof to direct water away and prevent water ingress. Flashing is typically used where the roof plane meets a vertical surface, around roof projections, or in valleys formed by two slopes. These critical areas are prone to potential infiltration points and water damage if not properly sealed.
The role of flashing is to prevent water from seeping into gaps between the roof surface and vertical walls, skylights, vents, or chimneys. Roofing professionals regard flashing as a critical component in preventing leaks, structural damage, and mould.
Australia’s diverse climate, with its variable weather patterns including heavy rains and storms, significantly increases the risk of water damage. Roof flashing acts as a frontline defence in protecting homes from these risks by ensuring water is directed away from vulnerable areas.
Common Roof Flashing Materials
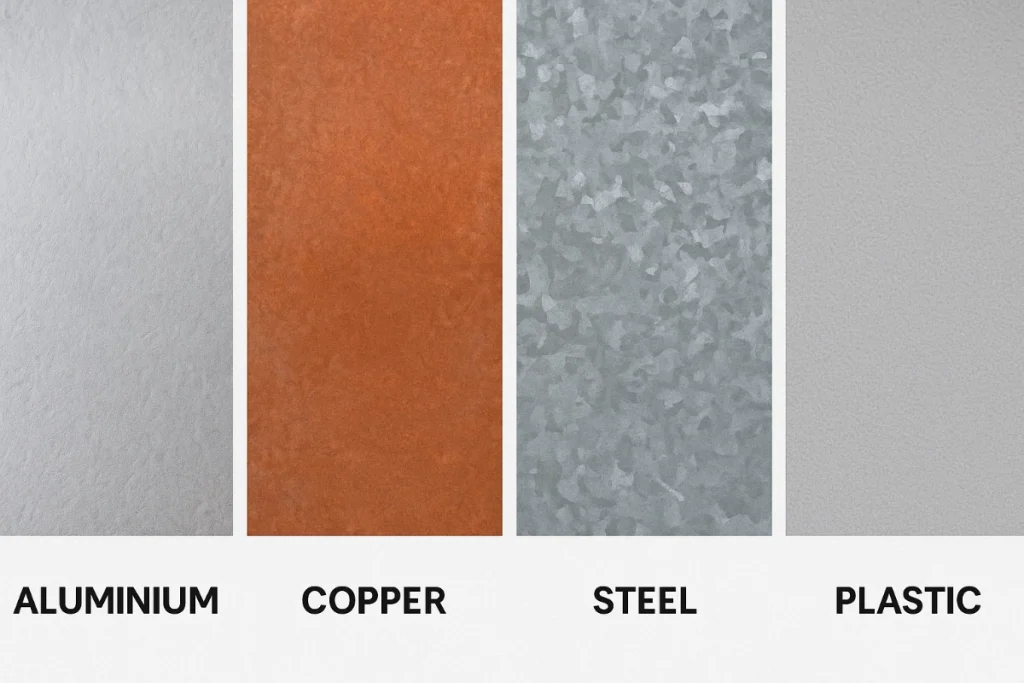
Metal Flashing Materials
Flashing is typically made from thin metal materials such as aluminium, copper, and steel, each offering specific advantages:
Aluminium is the most commonly used material for roof flashing due to its lightweight nature and ease of shaping, making it suitable for various applications.
Copper flashing is longer lasting than aluminium and is frequently used for chimney flashing and heritage or high-end projects due to its durability and aesthetic appeal.
Steel flashing, especially when galvanised, is corrosion resistant and offers a more aesthetically pleasing finish. It is also highly durable, making it suitable for harsh weather conditions.
Colorbond flashing is a pre-painted steel product commonly used in Australia, ideal for exposed flashing applications because of its corrosion resistance and wide range of colour options.
Composite and Flexible Flashing Materials
Plastic is waterproof and used in some flashing applications but cannot come into contact with asphalt roofing materials, limiting its use.
Rubber poses a fire risk and is not durable, so it is rarely used for roof flashings, though rubberised asphalt and butyl rubber may be applied in vent pipe flashing and base flashing systems.
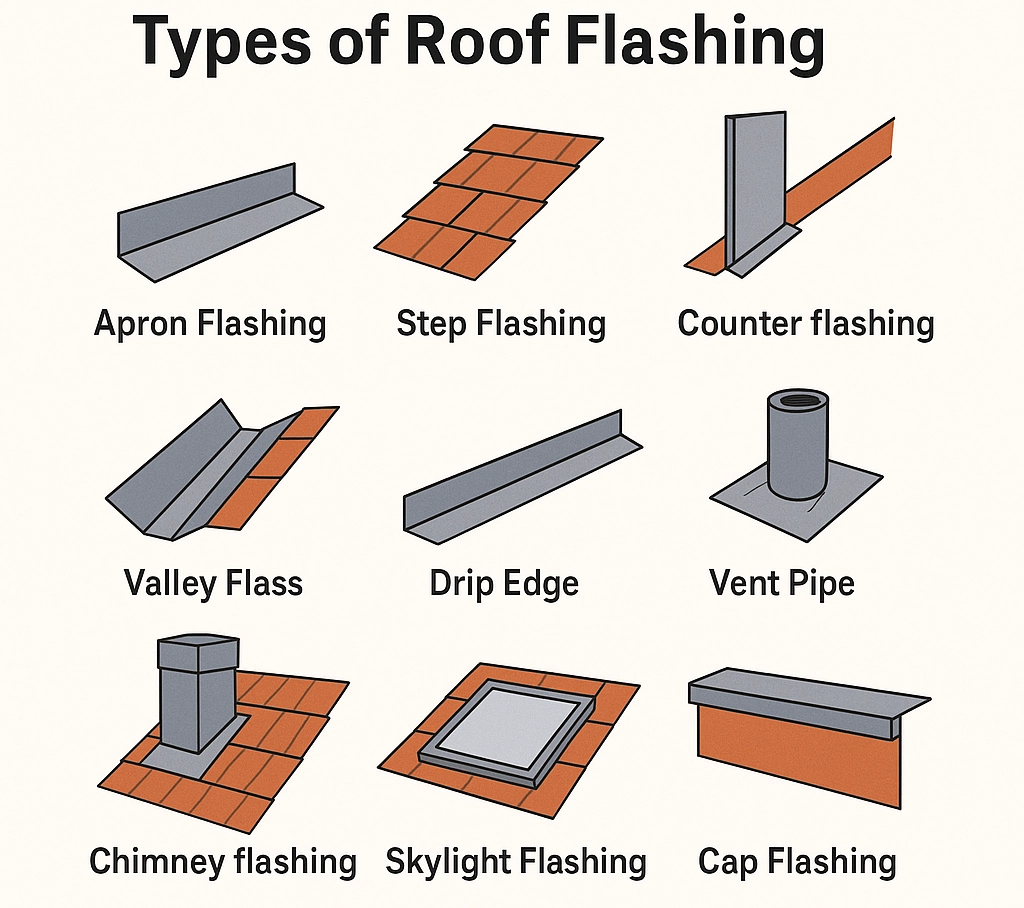
Different Roof Flashing Types
Understanding the various roof flashing types will help homeowners and builders select the right solution for each part of the roof.
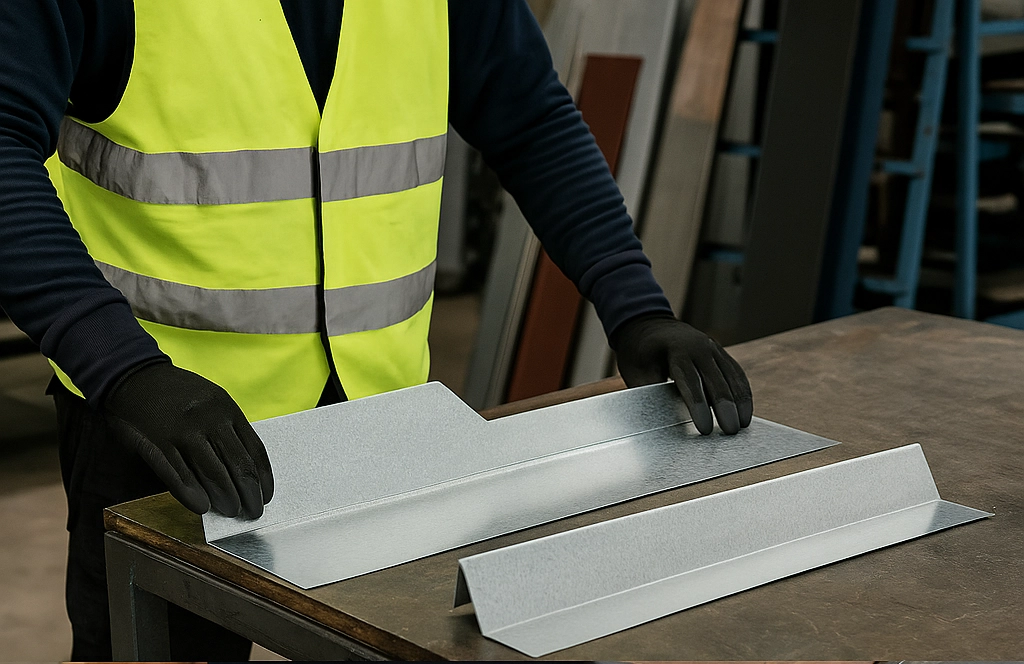
Apron Flashing
Apron flashing is an essential type of roof flashing used where roofs meet vertical walls or chimneys. It is typically a long piece of metal that seals the joint and directs water away, preventing leaks at these vulnerable intersections.
Step Flashing
Step flashing, also known as stepped flashing, is preferred for roof-to-side-wall flashing installations. It consists of multiple small pieces of L-shaped metal layered with each course of shingles to effectively channel water down and away from the wall.
Counter Flashing
Counter flashing is installed over step flashing or base flashing to create a layered barrier against water ingress. It is often embedded into masonry walls and overlaps the flashing beneath to provide maximum protection.
Valley Flashing
Valley flashing is installed in the open valleys where two roof slopes meet. These areas collect and direct rainwater off the roof, and valley flashing helps prevent debris buildup while ensuring water flows properly into square or rectangular gutters or box gutters.
Drip Edges
Drip edges are installed along the edges of the roof where the roof surface meets the gutter. They guide water away from the fascia and prevent it from flowing behind the shingles or under the roofing felt, protecting the roof structure and exterior walls.
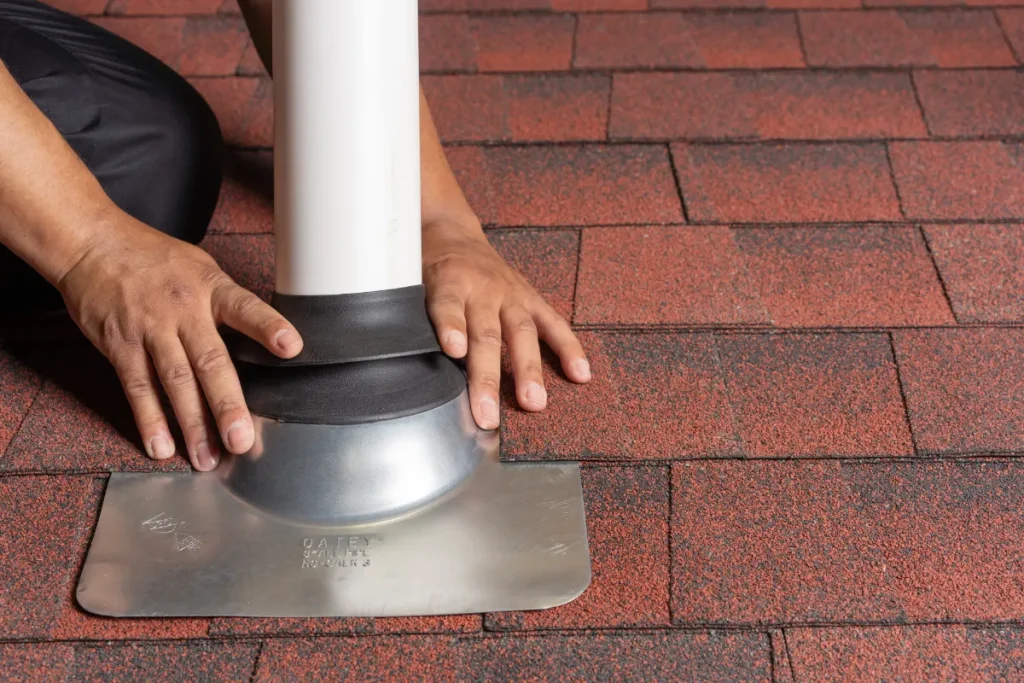
Vent Pipe Flashing
Also known as pipe flashing, this type is used where round or oval pipes penetrate the roof surface. It often involves a rubber boot or flexible membrane fitted tightly around the pipe to prevent leaks.
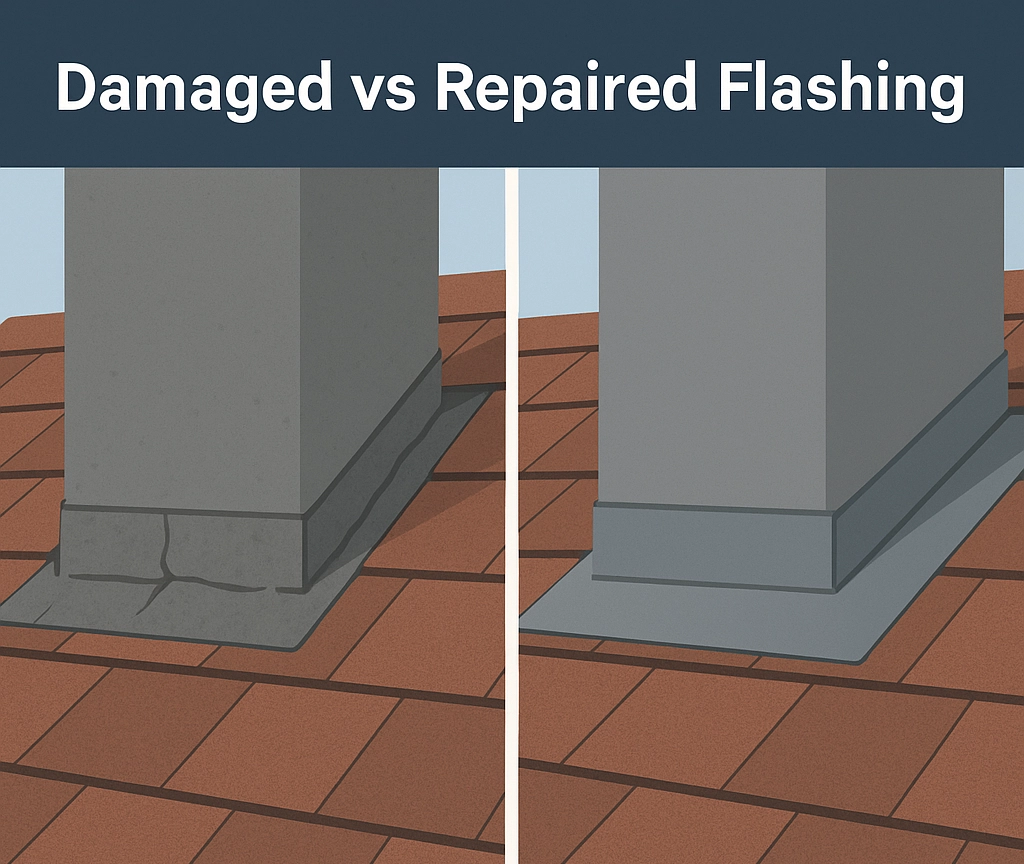
Chimney Flashing
Chimney flashing usually involves a combination of base flashing, step flashing, and counter flashing. Due to the complexity of chimney roof projections, multiple flashing pieces are necessary to fully protect against water ingress.
Skylight Flashing
Skylight flashing is used where skylights meet the roof. Typically, step flashing is applied around the sides, apron flashing at the base, and continuous or cap flashing at the top to ensure water is directed safely away.
Cap Flashing
Cap flashing is commonly used along parapet walls and above other types of flashing to cover and protect the exposed edges. It is also installed where vertical sheets of metal flashing terminate at a vertical feature.
Base Flashing
Base flashing is installed at the base of roof projections like chimneys or walls. It works together with counter flashing as part of a two-part flashing system to create a watertight seal.
Barge Flashing
Barge flashings seal and trim the edge of a roof, particularly on gable roofs, preventing water intrusion where roof sheeting ends and meets a vertical wall or bargeboard.
Ridge Flashing
Ridge flashing protects the roof apex and neatly joins two roof planes together, preventing water ingress at the highest point of the roof.
Wall Abutment Flashings
Wall abutment flashings are used where steel roof sheets finish against a wall, creating a watertight seal to prevent water from entering at the junction.
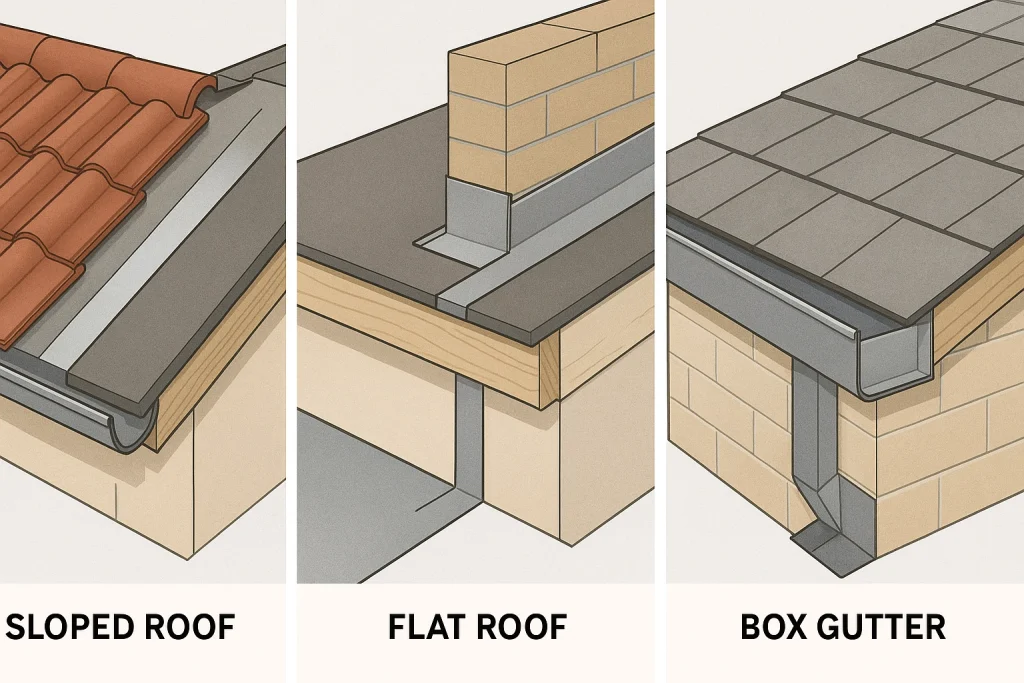
Flashing for Different Roof Structures
Sloped Roofs
Sloped roof systems often require a combination of step flashing, valley flashing, and drip edges. These types of flashing help prevent water from pooling and infiltrating vulnerable areas of the roof structure.
Flat Roofs
Flat roofs use continuous flashing and custom flashings to seal joints and expansion joints. Flashing is especially important around HVAC units, vents, and skylights.
Box Gutters
Box gutters require precise flashing at the edges and joins. Improperly flashed box gutters are a frequent source of water damage in Australian homes.
Vertical Walls and Features
Where a roof meets a vertical wall, flashing must be installed to prevent water running down the wall from entering the roof cavity. Vertical surface flashing must account for wall material (such as masonry walls) and potential fire risk, especially in bushfire-prone areas.
Manufacturing and Custom Flashings
Standard flashing profiles are available off the shelf, but roofing professionals often recommend custom flashings. These are manufactured to fit unique roof projections, curves, or angles. Custom flashings ensure a precise fit, minimising gaps and reducing the risk of leaks.
At Fremantle Roofing Services, we manufacture flashings to suit all types of roofs, including metal, tiled, and composite systems.
Why Flashing Is Critical to Preventing Water Damage
Improper flashing is one of the leading causes of water damage in Australian homes. Without correctly installed flashing materials, water can enter through potential infiltration points, resulting in:
Structural damage to trusses, beams, and walls
Mould and mildew growth
Rotting insulation and interior surfaces
Increased energy costs due to moisture exposure
Fire risk when water enters near electrical fixtures
By directing water away from vulnerable areas, flashing ensures the roof remains a barrier to external weather conditions.
Other Accessories that Complement Flashing
In addition to flashing, other accessories such as roofing felt, underlayment membranes, and proper gutter systems work together to protect the roof.
Roof flashing should always be installed in conjunction with compatible roof materials. For example, flashing used with metal roof sheeting must not create galvanic reactions that accelerate corrosion.
Expert Installation Matters
Installing flashing involves precision and experience. Even high quality materials like galvanised steel or rubberised membranes can fail if poorly installed.
Here is why professional installation is essential:
Roofing professionals understand water flow and flashing geometry
They ensure flashing integrates seamlessly with roof sheeting and roofing felt
Proper spacing, overlaps, and sealing at joints are maintained
Roof flashing is adapted to the unique climate and weather conditions in Western Australia
Proper installation techniques must consider temperature changes to prevent breaks or cracks in flashing. The installation of flashings may be completed either before or after the roof materials are installed, depending on the project requirements. Always refer to the manufacturer’s guidelines when installing any type of roof flashing to ensure effective waterproofing and durability.
Final Thoughts: Protect Your Roof with Proper Flashing
Flashing may be one of the most overlooked elements in roofing, but it is undeniably one of the most important. Whether it is valley flashing, vent pipe flashing, or chimney flashing, each type plays a vital role in preventing leaks and directing water away from critical areas.
At Fremantle Roofing Services, we specialise in assessing, installing, and repairing all types of roof flashing. From standard step flashing to complex skylight or two part flashing systems, our team ensures every piece is installed for maximum durability.
Do not let water damage catch you by surprise. Protect your roof and your home by speaking with the trusted roof repair professionals at Fremantle Roofing Services today.
Flashing is the quiet hero of a watertight roof. It is one of the essential elements of a weatherproof roofing system, ensuring that vulnerable areas are protected from water intrusion. It channels rain away from junctions and openings so water ends up in your gutters, not your ceiling. This guide explains where flashing goes, which tools and materials to use, and how to install the most common details on Australian roofs.
You will see short explanations followed by tight checklists so pros can scan and DIYers can follow along. This guide will help you achieve a successful roof flashing installation.
What Roof Flashing Does And Where It Goes
Flashing is a thin material, usually formed metal, that blocks water at vulnerable areas and roof features, such as chimneys, vents, dormers, and walls. Flashing acts as a barrier to prevent water infiltration and moves it back into the roof drainage path. You will find it wherever the roof surface meets a wall, exterior wall, or vertical wall, or where water concentrates around roof features.
Flashing acts to direct water away from vulnerable areas, ensuring water runs down and off the roof, which helps prevent leaks and water damage.
Tools And Materials You Will Need
Set up before climbing a ladder. Most mistakes happen when people rush or cut metal in the wrong place.
Tools:
Tin snips, nibbler and a hand seamer or small folding brake
Tape measure, builder’s line, square and scribe
Drill or driver, pop riveter, roofing nails or class 4 screws with EPDM washers
Caulking gun with neutral cure silicone or roofing cement where specified
Butyl tape and flashing tape for laps and selective sealing
PPE: harness or edge protection, non slip footwear, cut resistant gloves, eye protection
Materials guidance:
Roof flashings are typically made from thin material such as galvanised steel, which is lightweight, flexible, and durable for weatherproofing. Most building codes specify a minimum thickness for flashing material to ensure compliance and long-term performance.
Match flashing metal and coating to the roof (Colorbond, Zincalume, aluminium where appropriate)
Separate dissimilar metals with a compatible barrier to prevent corrosion, and ensure flashing is separated from other building materials like brick or wood to avoid chemical reactions.
Use proprietary pipe boots for round vents
Detail every piece with positive fall to avoid ponding and debris build up
Select compatible roof materials and roofing materials, considering how building materials expand and contract with temperature changes. Proper sealing and fastening techniques help accommodate this movement and prevent leaks.
Common materials used for flashing include galvanised steel, aluminium, and rubber. Choose materials based on durability, compatibility with roof materials, and installation requirements.
Safety First On A Metal Roof
Pick a dry, calm day and plan your anchor points. Avoid walking on dusty or wet sheets. Isolate nearby electrical equipment before cutting metal and never use abrasive wheels that can burn protective coatings.
Safety checklist:
Edge protection or harness with a rated anchor
Soft soled, non slip footwear
Cut resistant gloves and eye protection
Tethered tools and clean work zone
Weather check and stop work limits
Core Rules For A Watertight Result
A few rules make the difference between a dry roof and a slow leak.
Install in shingle fashion so upslope pieces overlap downslope pieces, and ensure the first row of shingles is properly overlapped to provide effective waterproofing
Turn up corrugated pans 20 to 30 mm at the high side where the roof meets a wall
Lap metal by at least 100 mm and compress with butyl where required
Fix on crests, not in pans, at 200 to 300 mm centres
Add an anti capillary offset fold or leave a 3 to 5 mm clearance so water cannot wick
Make sure roof underlay drains to daylight, not into wall cavities
Use sealant to complete joints at terminations and penetrations, not to replace laps and upstands
Following these rules is crucial for preventing leaks and ensuring your roof remains protected from water damage.
Underlay And Substrate Preparation At Walls And Chimneys
Before metal goes down, prepare the base. Dress a self adhesive waterproof membrane over the roof deck and continue it 100 to 200 mm up the wall surface and exterior wall. This ensures a sealed pan beneath the metal, helping to prevent water infiltration at the junction between the roof and wall. A waterproof membrane, such as an ice-and-water barrier, should cover the roof deck up to the base of the wall or chimney and extend 4–8 inches up the vertical surface before installing flashing. Always check the Building Code of Australia and supplier instructions.
Prep sequence:
Clean and dry the roof deck
Lay membrane on the deck and up the wall surface and exterior wall 100 to 200 mm to prevent water infiltration
Mark reference lines for laps and fixings
Dry fit the metal pieces before you fasten
Apron Flashing Installation At A Roof To Wall
Apron flashing protects the junction where the roof surface meets cladding or masonry. Start with clean bends and a firm dry fit. Then fix methodically and finish with counter flashing.
How to do it:
Measure And Pre Form – Upstand should be installed behind wall cladding 100 to 150 mm; cover over roof sheet at least 100 mm.
Dry Fit And Mark Laps – End laps 100 mm minimum with butyl tape.
Turn Up The Pans – Corrugated turn ups 20 to 30 mm at the high side.
Fix The Lower Edge – Fix through crests at 200 to 300 mm centres; never through pans.
Add Counter Flashing – Masonry Reglet chase 20 to 25 mm; or termination bar on cladding. Keep a weep path.
Seal Selectively – Use a caulking gun to seal chases and mitres. Do not block drainage.
Hose Test – Hose from low to high and check for back flow.
Step Flashing And Counter Flashing Against Masonry Or Cladding
Following a step by step process is essential for proper installation of step flashing and counter flashing.
Where a wall meets a pitched, shingled surface, step flashing is reliable, forgiving and proven.
Key points:
Installing flashing correctly is critical for waterproofing—cut L shaped steps about 200 mm long with a 75 to 100 mm vertical leg
Weave each piece between shingle courses with 100 mm head laps in the flow direction
Install a kickout flashing at the base to push water into the gutter
Finish with counter flashing chased 20 to 25 mm into mortar or fixed with a termination bar on cladding
Fix counter flashing to the wall only so the roof can move with temperature
How To Install Flashing On Corrugated Roof Penetrations
Chimneys, skylights and vents collect water and demand careful sequencing. The back pan does the heavy lifting as the base flashing for the penetration; side and head pieces complete the roof flashings system.
Penetration sequence:
Back pan, serving as the base flashing, extends at least 150 mm past each side of the penetration
Head of back pan tucks under counter flashing by 75 to 100 mm
Turn ups 20 to 30 mm at the upslope edge; turn down the lower edge
Side pieces overlap the back pan 100 mm with butyl tape
Fix on crests at 200 to 300 mm centres
Round vents use a profiled base and a storm collar sealed to the pipe, not the sheet
Metal forms the structure; sealant at collars and chases completes a neat watertight finish
Barge And Valley Flashing Basics
Barge flashing protects the gable edge from wind driven rain and finishes the profile neatly. Overlap lengths by at least 100 mm, fix on crests and use hemmed edges to stiffen the metal and reduce flutter.
At roof cladding edges located away from gutters, a cover flashing fastened on both faces is required to ensure proper weatherproofing and to prevent water ingress.
Valley flashing is the internal gutter where two roof planes meet. Size it for your rainfall and roof area, keep the path clear of debris and maintain steady fall to the gutters.
Quick specs:
Barge overlaps 100 mm minimum; hemmed edges preferred
Valley sized to catchment and intensity; clear of debris; positive fall to gutter
How To Install Gutter Flashing And Drip Edge
Eaves are a common leak point when water tracks behind the fascia. The drip edge stops that.
Do this:
Overhang the drip edge 10 to 15 mm into the gutter
Cover the fascia 20 to 25 mm to protect the timber
Fix on a crest or stiffened edge at 200 to 300 mm centres
Check that underlay and sheets discharge over the drip edge without back wicking
Sill, Jamb And Head Flashing Around Openings
Sequence is everything around openings. It keeps water moving outwards even if wind pushes rain behind cladding.
Correct order:
Sill Flashing First forms a pan that projects beyond the cladding
Jamb Flashings Next overlap the sill and channel water downward
Head Flashing Last sheds water over the jambs with a drip edge and end dams
Fasteners, Sealants And Compatibility In WA Conditions
Coastal and sub coastal WA needs extra care. Choose fixings and sealants that last and keep dissimilar metals apart.
Recommendations:
Class 4 self drilling screws with EPDM or neoprene washers
Neutral cure silicone at terminations; butyl tape in laps, applied neatly with a caulking gun. Using sealant to securely attach flashing is essential for effective waterproofing.
Keep copper away from Zincalume and Colorbond or separate with a membrane
Allow for thermal movement on long runs and avoid over fixing
For complex situations, installing roof flashing should be done by professional roofers to ensure safety and long-term performance. It is essential to confirm that the installation methods comply with local building codes during flashing installation.
Common Mistakes And How To Avoid Them
Improperly installed roof flashing is one of the most common causes of leaks and water damage. Most leaks come from small errors rather than bad materials.
Watch for:
Reverse laps that drive water upslope and behind metal
Fixing through pans instead of crests
Under bending aprons so they spring away from cladding
Blocking weeps under counter flashing
Relying on sealant as the primary waterproofing
Abrasive cutting that burns protective coatings
Quick Checklist Before You Leave The Roof
Upstand 100 to 150 mm at roof to wall; cover over sheet at least 100 mm
Turn ups 20 to 30 mm at corrugated high sides
End laps 100 mm minimum, compressed with butyl
Fixings on crests at 200 to 300 mm centres with sound washers
Anti capillary fold or 3 to 5 mm clearance on edges
Drip edge overhang 10 to 15 mm and fascia cover 20 to 25 mm
Underlay dressed up walls 100 to 200 mm where required


